Cranking out a GUI with Conrod
This is the first post in a series on GUI development in Rust. I'll start with a bit of background on my particular use cases, and then get into some of what I've learned over the last few months about GUI development with Conrod, one of the more complete GUI libraries in the Rust ecosystem.
Background
Almost two years ago I started a new personal project in Rust. At the time, I had a few months' experience with the language thanks to an aborted personal project. This new project, like the old one, is designed as an economic simulation tool for roleplaying games. Its aim is to provide the user with a representation of a trade network across many settlements, where goods are produced and exchanged in different locations and traded from one place to another. Users can add a series of towns to the network, describe their local industries and their connections to neighbouring towns, and then select any town on the map to see what is for sale there and how much those goods cost.
Whereas for the first project I had mostly stuck to a terminal-based system, for this new project I wanted to have graphics. The towns should be displayed on screen so that a user could visualize the network. The target user wouldn't necessarily be a particularly savvy hacker: maybe they just want to draw out their network, throw in some details and then get the program to spit out a list of goods available at a given town, with prices adjusted as necessary.
Essentially, I just wanted a fancy graph visualizer with a few extra GUI elements. At the time when I started, one of the more prominent tools for game development was piston, with conrod for GUI development. After some initial work messing around with creating the graph in piston, I moved over to conrod when I found myself looking at reimplementing a lot of basic GUI features from scratch. Conrod's not perfect, and there have been several alternatives that have arrived over the last few years. It's possible I could still move over to one of those, but for now, I'm finding conrod is a useful way to learn more about the ins and outs of GUI development.
Up to this point, I've done some basic work implementing a GUI for the project. It looks very roughly like how I would like it to look, but there's a few critical pieces missing still that prevent it from being a "working" GUI (like that crucial graph widget!) I've done a bit of work on the side to break off chunks like prompts to give myself more high-level tools to use across projects, but there's still lots to be done.
Hence, this series, which I intend to use to explore some of how conrod works currently and how to use it for GUI development. My hope is that describing some of this process in greater detail will help both me and the reader notice ways to improve the Rust GUI ecosystem further and develop better GUI applications. Here goes!
Hello, world!
Let's start with the basics. I'll assume everyone's familiar with Rust, and you all have at least some idea what conrod is (for those out of the loop on the latter, the very terse and slightly out-of-date conrod guide may be of some extra use). The examples in the conrod repo are useful, but it's a lot of material all at once, so let's break one down to start.
Conrod allows for multiple different graphics backends. I have been trying to learn more about Vulkan and vulkano, one of the more prominent Rust crates for interacting with Vulkan, but for now I've stuck with glium, which wraps around OpenGL and doesn't require us to worry about scary things like shaders or how a GPU works.
Note that this example is taken from the conrod repo, but with some extra details filled in to give us more background about what conrod is doing under the hood.
Set up
Step 1, let's create a new project.
cargo new --bin conrod_hw
cd conrod_hw
We'll start by adding the necessary dependencies to our Cargo.toml file.
Conrod recently (since version 0.62, I believe) changed to a workspace model
with multiple subcrates, so we now add a dependency on conrod_core and
on the backend of our choice (conrod_glium, in this case).
We also will want to use conrod_winit to interface between conrod and
winit, which we'll use to create our windows.
[package]
name = "conrod_hw"
version = "0.1.0"
edition = "2018"

[dependencies]
conrod_core = "0.68"
conrod_glium = "0.68"
conrod_winit = "0.68"
glium = "0.24"
winit = "0.19"
One big pain point that we're already going to have is that we have to manage a lot of
dependencies doing this.
Glium and winit both need to be listed as dependencies, and we need to choose the version
that is being used by conrod_glium and conrod_winit, or else we can end up with
incompatibility problems between the versions of glium and winit that conrod expects!
Right now, the newest versions of conrod_glium and conrod_winit are using glium 0.24
and winit 0.19, so that's what we'll have to use too.
There are some nice features in the current versions of glium and winit that we unfortunately
can't use, but hopefully when someone (perhaps myself) tests them and submits a PR,
conrod can keep a little closer to the update cycle of these crates.
It's not the best, but it's what we'll have to make do with.
That should be enough for now, so let's take a look at our rather empty main.rs file.
fn main() {
    println!("Hello, world!");
}
If we were ordinary programmers, that would be enough for us, but we want to learn about GUIs today, so let's start by writing down what we need to add to make this a "Hello, world!" with a little pizzazz:
- Build the window using winit.
- Construct our UI.
- Set up everything we need to create our widgets.
- Create our renderer.
- Make the event loop.
This is the rough format I've used for my project up to this point, and it seems to be the same thing every conrod example does, so let's just assume it's authoritative.
For today, our window will simply display the text "Hello, world!" Very boring, I know, but it'll give me an excuse to describe the basics of conrod and then we can start making our own fancy-shmancy custom widgets next time.
Building the window
Let's start by adding some code to create a window onscreen, and learn about the grizzly guts of how to interact between glium and winit via conrod.
let mut events_loop = glium::glutin::EventsLoop::new();
let window = glium::glutin::WindowBuilder::new()
    .with_title("Hello, world!")
    .with_dimensions((400, 200).into());
let context = glium::glutin::ContextBuilder::new()
    .with_vsync(true)
    .with_multisampling(4);
Did you think conrod would be the only crate that was wrapping dependencies? Not even close! Here we see that glium wraps another crate, glutin, which packages together some context creation utilities for making things like event loops, windows and contexts. Also note that a lot of this code will be using the builder pattern to make our nice Rusty structs (the Wikipedia page might be a little too complicated to describe what's happening, but we're basically just getting around the fact that a window has many possible attributes we might want to configure on initialization, but we don't have optional arguments in Rust).
I'd said that the events would come last, but glium wants us to have an
EventsLoop ready to pass in from the start, so we're creating it now.
We'll be adding things to it eventually, hence the mut keyword.
You can also see here that glutin has its own type for representing the
dimensions of a window, hence the .into() method call.
We're setting up these variables to then be used in our next
step as part of a glium::Display.
pub struct GliumDisplayWinitWrapper(pub glium::Display);

impl conrod_winit::WinitWindow for GliumDisplayWinitWrapper {
    fn get_inner_size(&self) -> Option<(u32, u32)> {
        self.0.gl_window().get_inner_size().map(Into::into)
    }
    fn hidpi_factor(&self) -> f32 {
        self.0.gl_window().get_hidpi_factor() as _
    }
}

conrod_winit::conversion_fns!();

let display = glium::Display::new(window, context, &events_loop)
    .expect("failed to create display");
let display = GliumDisplayWinitWrapper(display);
Here's where more messy wrapping comes in.
We need to bring in a couple methods from conrod_winit in order
to be able to convert later between winit events and conrod events.
We implement the WinitWindow trait on our wrapper type, which will
allow us to convert winit's Events into conrod ones.
The mysterious conversion_fns!() macro generates a bunch of functions
to convert between winit and conrod.
For those wondering why this is done via a macro, the conrod_winit crate has
this to say:
The reason we provide macros and don't implement functions using the winit crate directly is that conrod has many backends that use winit, often with differing versions. By providing macros, we allow these backends to generate code necessary for whatever version of winit they are currently using. This means we don't have to wait for all of the backend winit dependencies to synchronise before we can publish new conrod releases.
Well, I'm satisfied with their explanation.
The rest is just creating a glium::Display and then wrapping it using our
handy and delightfully-named GliumDisplayWinitWrapper.
Let's do a quick refactor and take a look at main.rs again with these new additions.
pub struct GliumDisplayWinitWrapper(pub glium::Display);

impl conrod_winit::WinitWindow for GliumDisplayWinitWrapper {
    fn get_inner_size(&self) -> Option<(u32, u32)> {
        self.0.gl_window().get_inner_size().map(Into::into)
    }
    fn hidpi_factor(&self) -> f32 {
        self.0.gl_window().get_hidpi_factor() as _
    }
}

conrod_winit::conversion_fns!();

const WIDTH: u32 = 400;
const HEIGHT: u32 = 200;

fn main() {
    // Build the window.
    let mut events_loop = glium::glutin::EventsLoop::new();
    let window = glium::glutin::WindowBuilder::new()
        .with_title("Hello, world!")
        .with_dimensions((WIDTH, HEIGHT).into());
    let context = glium::glutin::ContextBuilder::new()
        .with_vsync(true)
        .with_multisampling(4);
    let display = glium::Display::new(window, context, &events_loop).unwrap();
    let display = GliumDisplayWinitWrapper(display);

    println!("Hello, world!");
}
If you cargo run this code, you should see a few warnings about the unnecessary mut and
the unused display variable, then a window will briefly flash across the screen like a comet
before disappearing once more into the night, and our "Hello, world!" will appear in the terminal.
If that doesn't happen, maybe you are missing graphics libraries?
Anyway, we've spent long enough on this part, let's get to drawing things!
Drawing things
Conrod has a couple components to draw GUIs.
The next type is perhaps the most important one: it's called Ui!1
Ui manages all the important widget state and rendering information you need to create your GUI.
This might be a good time to digress (not again!) and talk a little about how conrod's UI structure works.
Conrod's UI
The UI structure in conrod boils down to a DAG which represents the relationship of widgets to one another.
The root of the DAG is the window, and each widget has an edge from its parent to itself.
Conrod uses the lovely petgraph library to represent this DAG (I am using it too on my end),
and one nice feature of doing so is that it associates an index with each widget that matches its
address in the graph's underlying node array.
This means that a conrod_core::widget::id::Id is just a petgraph::graph::NodeIndex<u32>, so we
can pass around indices to the widgets without getting trapped in the kind of nightmarish circular
data structure business that Rust doesn't like handling.
The UI structure is what controls the positioning of widgets in relation to one another, and it has many
methods to do so that I won't get into just yet.
The important thing is that the Ui will keep track of all of our widgets, along with their current
rendering state and their input state, which will be important when we want to start making them react to stuff.
It also keeps track of our fonts, which will be useful for any kind of text we want to put in our UI.
Okay, enough digressing. Here's some more code.
let mut ui = conrod_core::UiBuilder::new([WIDTH as f64, HEIGHT as f64]).build();

use conrod_core::widget_ids;
widget_ids!(struct Ids { text });
let ids = Ids::new(ui.widget_id_generator());
To start with, we use another builder to create the UI here.
Ui is given the window dimensions again, this time in a slightly different form for its own nefarious purposes.
We also get to add some Ids to our Ui for representing the widgets we want to use!
widget_ids! is something you can expect to see defined whenever any widget is being made in conrod,
and you can think of our window like a big widget!
It essentially allows us to describe what children we want to add to this widget, and gives us nice names
to refer to them with, rather than having to directly pick out the index associated with a given widget.
Here, we are just generating a single widget id called text, which will represent the beautiful text we want to
put on the screen.
The macro will then create a struct with the name we've given (Ids) and a single field text to refer to
the particular Id that will be associated with our text widget.
The ids variable will then store the initialized form of this struct for us, using the id generator that the
Ui keeps handy for us.
Now we want to draw text, and for that, we need fonts. We could be boring and just download something off Google's enormous database, but since I'm in charge I get to pick something a little weirder, so I'm going to get us some fonts courtesy of Igino Marini, who has digitally reproduced the Fell Types on his website. These are some really beautiful fonts that you can find yourself in some Oxford University Press manuscripts. I'll go ahead and download the fonts and save them to an assets subdirectory.
curl https://iginomarini.com/fell/wp-content/uploads/IMFellTypesPlain.zip --output FellTypes.zip
unzip FellTypes.zip -d assets/
Now let's add some code to source the fonts so our Ui can use them:
// Add a `Font` to the `Ui`'s `font::Map` from file.
let font_path = "assets/IMFePIrm29P.ttf";
ui.fonts.insert_from_file(font_path).unwrap();

// A type used for converting `conrod_core::render::Primitives` into `Command`s that can be used
// for drawing to the glium `Surface`.
let mut renderer = conrod_glium::Renderer::new(&display.0).unwrap();

// The image map describing each of our widget->image mappings (in our case, none).
let image_map = conrod_core::image::Map::<glium::texture::Texture2d>::new();
I've saved most of the comments from the repository code here, but just to reiterate:
we start by adding the fonts to our UI (in this case, I've picked the Pica),
then we initialize a Renderer to help us interact with glium via conrod.
Finally, we create an associative array mapping widgets to images, for the cases where we need
to load in images.
We don't have any for this example, so it's empty, but we still need it anyway so just bear with me.
We're actually almost done now.
The last piece is our trusty events loop!
Let's just review the state of main.rs again:
pub struct GliumDisplayWinitWrapper(pub glium::Display);

impl conrod_winit::WinitWindow for GliumDisplayWinitWrapper {
    fn get_inner_size(&self) -> Option<(u32, u32)> {
        self.0.gl_window().get_inner_size().map(Into::into)
    }
    fn hidpi_factor(&self) -> f32 {
        self.0.gl_window().get_hidpi_factor() as _
    }
}

conrod_winit::conversion_fns!();

const WIDTH: u32 = 400;
const HEIGHT: u32 = 200;

fn main() {
    // Build the window.
    let mut events_loop = glium::glutin::EventsLoop::new();
    let window = glium::glutin::WindowBuilder::new()
        .with_title("Hello, world!")
        .with_dimensions((WIDTH, HEIGHT).into());
    let context = glium::glutin::ContextBuilder::new()
        .with_vsync(true)
        .with_multisampling(4);
    let display = glium::Display::new(window, context, &events_loop).unwrap();
    let display = GliumDisplayWinitWrapper(display);

    // construct our `Ui`.
    let mut ui = conrod_core::UiBuilder::new([WIDTH as f64, HEIGHT as f64]).build();

    // Generate the widget identifiers.
    use conrod_core::widget_ids;
    widget_ids!(struct Ids { text });
    let ids = Ids::new(ui.widget_id_generator());

    // Add a `Font` to the `Ui`'s `font::Map` from file.
    let font_path = "assets/IMFePIrm29P.ttf";
    ui.fonts.insert_from_file(font_path).unwrap();

    // A type used for converting `conrod_core::render::Primitives` into `Command`s that can be used
    // for drawing to the glium `Surface`.
    let mut renderer = conrod_glium::Renderer::new(&display.0).unwrap();

    // The image map describing each of our widget->image mappings (in our case, none).
    let image_map = conrod_core::image::Map::<glium::texture::Texture2d>::new();

    println!("Hello, world!");
}
If you run this, you should still not see anything show up on screen, since we haven't actually asked the renderer to do any drawing in our events loop. Let's add that in!
Loop time
Here comes the fun part. As with all graphics code, we want to display something to the screen, have it updated every couple microseconds as changes occur and let the users feel like they have power for once in their lives and can tell the computer what to do for a change.
To do this, we create an event loop, that will run forever, responding to events from our user, until
they quit or kill the program.
If an event occurs, we update the renderer state and show that change to the user, who can then interact with
the program again and cause further changes to occur.2
Incoming big pile of code:
let mut events = Vec::new();

use glium::Surface;
'render: loop {
    events.clear();

    // Get all the new events since the last frame.
    events_loop.poll_events(|event| { events.push(event); });

    // If there are no new events, wait for one.
    if events.is_empty() {
        events_loop.run_forever(|event| {
            events.push(event);
            glium::glutin::ControlFlow::Break
        });
    }

    // TODO: handle events

    // Draw the `Ui` if it has changed.
    if let Some(primitives) = ui.draw_if_changed() {
        renderer.fill(&display.0, primitives, &image_map);
        let mut target = display.0.draw();
        target.clear_color(0.0, 0.0, 0.0, 1.0);
        renderer.draw(&display.0, &mut target, &image_map).unwrap();
        target.finish().unwrap();
    }
}
Here's our loop. It does everything we need, except for actually drawing anything! Yes, not very useful right now, but let me break down what's happening here first, and then we can move on to the fancy stuff.
To start, we keep track of our current events with the events vector.
We ask the event loop (which is hooked into our glium::Display, if you'll recall)
if any new events have arrived courtesy of glium recently.
The run_forever method will block until one of these methods arrives, at which
point it will break (using that fancy glium::glutin::ControlFlow::Break variant).
I've skipped down past the actual handling of the events we collect to the drawing part here.
Essentially, it just asks if the UI has changed since it was last drawn and, if so,
redraws it from scratch using our renderer.
The primitives are all the basic building blocks we use to represent graphics elements,
which we pass in to the renderer.
The target variable is a frame that implements Surface, meaning we can
draw on it.
clear_color is taking a 0.0--1.0 representation of RGBA right now that makes everything black.
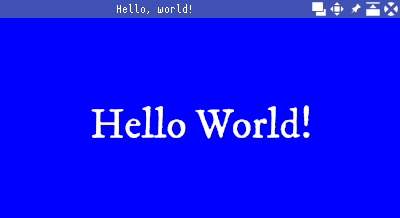
If we change this to clear_color(0.0, 0.0, 1.0, 1.0), we'll get a very intense blue instead.
If you run this code now, you may notice that "Hello, world!" isn't getting printed, and Rust of course tells you that it's unreachable code, since our loop never exits. You may also find that you can't close the window by normal means, but must send it a SIGTERM signal.

Well that won't do, so let's actually write some event handling code.
for event in events.drain(..) {

    match event.clone() {
        glium::glutin::Event::WindowEvent { event, .. } => {
            match event {
                glium::glutin::WindowEvent::CloseRequested |
                glium::glutin::WindowEvent::KeyboardInput {
                    input: glium::glutin::KeyboardInput {
                        virtual_keycode: Some(glium::glutin::VirtualKeyCode::Escape),
                        ..
                    },
                    ..
                } => break 'render,
                _ => (),
            }
        }
        _ => (),
    };

    let input = match convert_event(event, &display) {
        None => continue,
        Some(input) => input,
    };

    ui.handle_event(input);

    let ui = &mut ui.set_widgets();
}
All right, what's happening here?
After draining our events out of the Vec,
we start off by allowing our dear users to stop the loop.
The match statement here allows us to match on a CloseRequested event (like clicking on
the close button in your window manager) or on the Escape virtual key code:
in either case, we simply break out of our rendering loop, print "Hello, world!" and get on with our
busy lives!
After this case is considered, we use one of those winit conversion functions we created way back
up top to convert our input from glium form to conrod form.
We then pass that input into our Ui to be handled.
This interprets the event that's passed in, updates the Ui's state and stores the information to feed into
our child widgets as need be later.
Finally, we update our Ui by instantiating all our widgets using set_widgets().
Now, if we run this, we get the same window as before, but we can at least close it.
The real kernel that I've been waiting all this time to show you is our Text widget!
use conrod_core::{widget, Positionable, Colorable, Widget};
widget::Text::new("Hello World!")
	.middle_of(ui.window)
	.color(conrod_core::color::WHITE)
	.font_size(39)
	.set(ids.text, ui);
This quick little builder statement is all we need now to draw our beautiful letters on the screen.
We need to bring a few traits into scope so that the Text widget can be positioned (via middle_of),
colored (via color) and set in the UI (using the Widget trait).
Then we simply describe what we want to see, set the widget by associating it with one of our Ids
and let the graphics people handle the rest!
Once we add that into our main function, we should now see something like this:
And the full 118 lines of code:
pub struct GliumDisplayWinitWrapper(pub glium::Display);

impl conrod_winit::WinitWindow for GliumDisplayWinitWrapper {
    fn get_inner_size(&self) -> Option<(u32, u32)> {
        self.0.gl_window().get_inner_size().map(Into::into)
    }
    fn hidpi_factor(&self) -> f32 {
        self.0.gl_window().get_hidpi_factor() as _
    }
}

conrod_winit::conversion_fns!();

const WIDTH: u32 = 400;
const HEIGHT: u32 = 200;

fn main() {
    // Build the window.
    let mut events_loop = glium::glutin::EventsLoop::new();
    let window = glium::glutin::WindowBuilder::new()
        .with_title("Hello, world!")
        .with_dimensions((WIDTH, HEIGHT).into());
    let context = glium::glutin::ContextBuilder::new()
        .with_vsync(true)
        .with_multisampling(4);
    let display = glium::Display::new(window, context, &events_loop).unwrap();
    let display = GliumDisplayWinitWrapper(display);

    // construct our `Ui`.
    let mut ui = conrod_core::UiBuilder::new([WIDTH as f64, HEIGHT as f64]).build();

    // Generate the widget identifiers.
    use conrod_core::widget_ids;
    widget_ids!(struct Ids { text });
    let ids = Ids::new(ui.widget_id_generator());

    // Add a `Font` to the `Ui`'s `font::Map` from file.
    let font_path = "assets/IMFePIrm29P.ttf";
    ui.fonts.insert_from_file(font_path).unwrap();

    // A type used for converting `conrod_core::render::Primitives` into `Command`s that can be used
    // for drawing to the glium `Surface`.
    let mut renderer = conrod_glium::Renderer::new(&display.0).unwrap();

    // The image map describing each of our widget->image mappings (in our case, none).
    let image_map = conrod_core::image::Map::<glium::texture::Texture2d>::new();

    let mut events = Vec::new();

    use glium::Surface;
    'render: loop {
        events.clear();

        // Get all the new events since the last frame.
        events_loop.poll_events(|event| { events.push(event); });

        // If there are no new events, wait for one.
        if events.is_empty() {
            events_loop.run_forever(|event| {
                events.push(event);
                glium::glutin::ControlFlow::Break
            });
        }

        // Process the events.
        for event in events.drain(..) {

            // Break from the loop upon `Escape` or closed window.
            match event.clone() {
                glium::glutin::Event::WindowEvent { event, .. } => {
                    match event {
                        glium::glutin::WindowEvent::CloseRequested |
                        glium::glutin::WindowEvent::KeyboardInput {
                            input: glium::glutin::KeyboardInput {
                                virtual_keycode: Some(glium::glutin::VirtualKeyCode::Escape),
                                ..
                            },
                            ..
                        } => break 'render,
                        _ => (),
                    }
                }
                _ => (),
            };

            // Use the `winit` backend feature to convert the winit event to a conrod input.
            let input = match convert_event(event, &display) {
                None => continue,
                Some(input) => input,
            };

            // Handle the input with the `Ui`.
            ui.handle_event(input);

            // Set the widgets.
            let ui = &mut ui.set_widgets();

            // "Hello World!" in the middle of the screen.
            use conrod_core::{widget, Positionable, Colorable, Widget};
            widget::Text::new("Hello World!")
                .middle_of(ui.window)
                .color(conrod_core::color::WHITE)
                .font_size(39)
                .set(ids.text, ui);
        }

        // Draw the `Ui` if it has changed.
        if let Some(primitives) = ui.draw_if_changed() {
            renderer.fill(&display.0, primitives, &image_map);
            let mut target = display.0.draw();
            target.clear_color(0.0, 0.0, 1.0, 1.0);
            renderer.draw(&display.0, &mut target, &image_map).unwrap();
            target.finish().unwrap();
        }
    }

    println!("Hello, world!");
}
And that's our first conrod program! Admittedly, there's much fancier examples in the repository, and for the next post I'd like to show you how we can make custom widgets we can actually interact with, but we'll conclude here for now and we can dig into this some more next time. Ciao!
Footnotes
1 At the time that I wrote this, the docs for conrod 0.68 weren't built correctly on docs.rs,
so we're using the 0.67 docs. ↩
2 This is basically the model-view-controller pattern ↩